[ihc-hide-content ihc_mb_type=”show” ihc_mb_who=”reg” ihc_mb_template=”3″ ]
[vc_row][vc_column][vc_column_text]
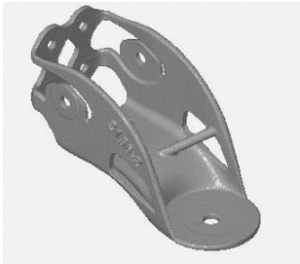
3D printed aerospace brackets made from titanium alloys are becoming more common in the design of spacecraft and satellites. Any aerospace component, however, cannot just be 3D printed and stuck onto the spacecraft – it must be tested and qualified to make sure that its mechanical behavior, among other qualities, is acceptable. In a study entitled “Non-Contact Measurement Techniques for Qualification of Aerospace Brackets Made by Additive Manufacturing Technologies,” a team of researchers undertakes a feasibility study of the Thermoelastic Stress Analysis (TSA) on a titanium alloy space bracket made by Electron Beam Melting.[/vc_column_text][vc_column_text]The researchers developed a methodology that they implemented on a titatium based-alloy satellite bracket. They first designed a test bench for TSA. In order to define possible deviations between the expected and actual mechanical behavior, they compared TSA results with a Finite Element Analysis evaluated on the CAD model.
“We focused our attention on the regions where the evaluated FEM predicts higher stress concentrations, i.e. the curvatures near the rigid body constraint (see figure 3), and we observed them both from the outer side and from the inner one,” the researchers state. “…In figure 4 (a), the stress localization is in accordance with the predicted one, confirming the feasibility of TSA investigation for the examined component. On the other side, figure 4(b) shows another result in accordance with the physics of the problem: the upper and the lower curvatures work oppositely in terms of stress: when the ones are stretched, the others are compressed and vice-versa.”
[/vc_column_text][vc_single_image image=”4500″ img_size=”full” alignment=”center”][vc_column_text]They extracted significant interrogation lines in order to gain more sensitivity about the stress trends.
“Therefore, it is remarkable that the stress trend relative to the FEM analysis conducted on the CAD model (figure 5(b)) is much smoother than the trends in the actual component,” the researchers continue. “This is an unexpected datum, since it generally happens the opposite due to the fact that a small amount of heat exchange always occurs during a Thermoelastic test, smoothing the curves, and providing a small loss of resolution. On the contrary, our test campaign reveals that the particular micro/macro structure and the surface roughness provided by the Additive Manufacturing process, lead to localized stress peaks, not predictable a-priori.”
[/vc_column_text][vc_single_image image=”4501″ img_size=”full” alignment=”center”][vc_column_text]The results of the analysis showed the same trends at larger scales, but smaller unexpected peaks in the TSA data and in the evaluated FEM, due to the particular micro and macro conformation given by the 3D printing process.
“Hence, our measurement technique, in conjunction with usual morphological and dimensional investigation, could make available a more complete Non- Destructive qualification process for AM made aerospace brackets, giving information about the effective mechanical behavior of these structures,” the researchers conclude.
Authors of the paper include G. Allevi, M. Cibeca, R. Fioretti, R. Marsili, R. Montanini and G. Rossi.[/vc_column_text][/vc_column][/vc_row]
[/ihc-hide-content]
The AM Chronicle Editorial Team is a collective of passionate individuals committed to delivering insightful, accurate and engaging stories to additive manufacturing audiences worldwide.


